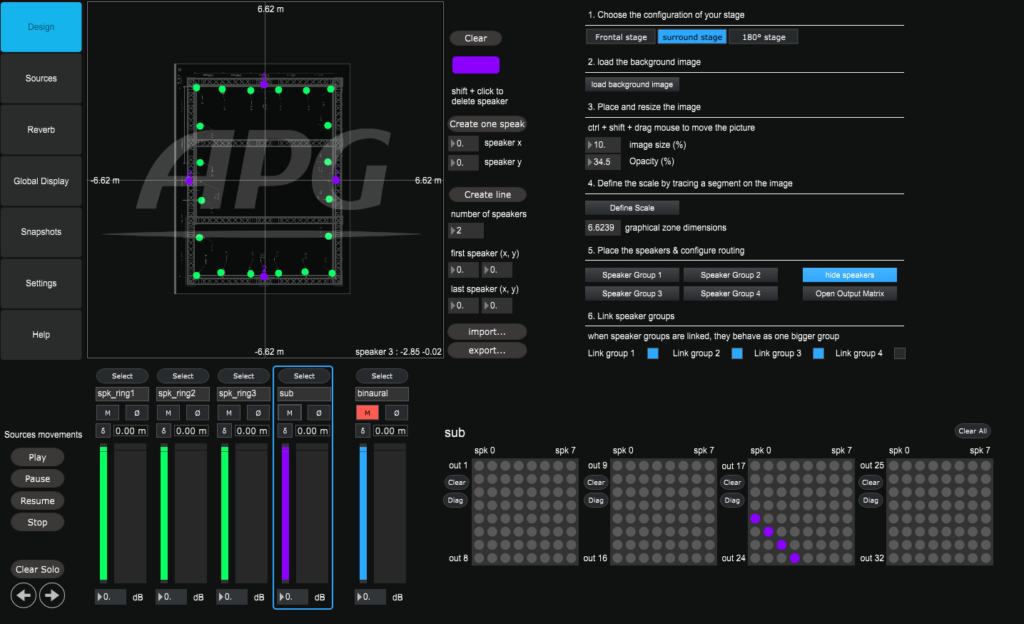
1.1 – Configuration of the stage
- Choose your use case :
- Frontal stage :
- Must be used for theaters or concert stages where all speakers are aligned on the front of the stage.
- The binaural listening position is set centered at the bottom of the graphical area
- Surround stage
- Must be used for configuration where the sound sources can be spatialized at 360°.
- The binaural listening position is set in the center of the graphical area.
- 180° stage
- Must be used for immersive configurations where the listener should hear sources all around him but not behind.
- The binaural listening position is set centered at the bottom of the graphical area
- Frontal stage :
- Load background image : Allows loading a background image (venue plan)
- Image size : Resize the plan to adapt it to the graphical area
- move image in the graphical area: Keep Ctrl + shift and the left button of the mouse pushed and move the mouse in the graphical area
- Opacity : Allows to the transparency of the image
- Define scale : Click on « Define Scale » to define the scale of the loaded image. Then draw a line in the graphical area between two points for which you know the distance. Enter the distance in meters in the dialog window.
To ensure a good readability of the UI, use black and white images in negative. If the spatialization zone has an orientation (the audience is on one side and the audio objects on the opposite side), it is recommended to have the audience on the lower side of the graphical area to keep the compatibility with other spatialization tools (OSC control…)
1.2 – Speakers groups
- Speaker groups : The speaker groups buttons select the groups for the edition of the speakers positions and routing
- Show Speakers : This button allows seeing/hiding all speakers on the graphical area
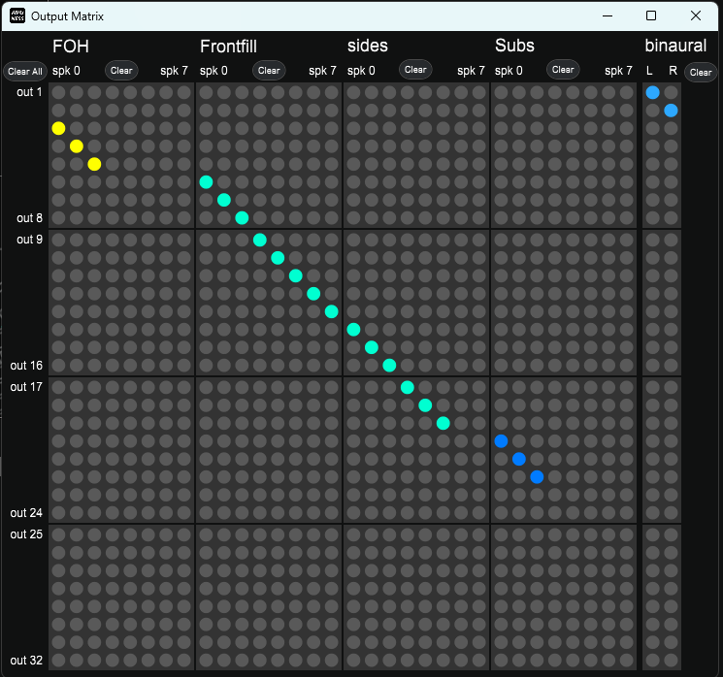
- Open Output Matrix : Opens the matrix to route the speakers signals to each of the physical outputs of the sound card
- Link speaker groups
This button allows seeing/hiding all speakers on the graphical areaIf 8 speakers per group are not enough for your setup, you can create a bigger group just by linking several groups. Just check the groups you want to link. Once linked, the parameters of the linked groups are shared for all speaker groups in the link. If you change the color, edit the gain, mute one the subgroup… all other subgroups will see their parameters changing the same way.
2 – Speaker groups configuration
A speaker group has a maximum of 8 speakers. 4 groups are available.
Click on the select button of the group to configure to display the UI for the creation and placement of the speakers
- Clear : Remove all speakers in the group
- Color : Change the color of the group, the color will be applied to all faders sending signal to the group outputs, and to all objects representing the speakers in the graphical area
- Create one speaker : Create on speaker at the coordinates entered in the numboxes (speaker x, speaker y)
- Create line : Creates a line of equidistant speakers. The number of speakers, the coordinates of the first and last speaker can be set in the commands below the button
- Import : Import a text file containing the coordinates of the speakers and creates the speakers at these coordinates. A group can only have 8 speakers, only the first 8 lines of the file will be imported.
- Export : Export in a text file the coordinates of the speakers of the group
- Presets bar : When approaching the mouse to the upper side of the graphical area, the preset bar is displayed

- Load : Loads a preset file for the current group of speakers
- Save : Save the current state of the speaker group in the current preset
- Export : Export all the presets of the speaker group un a .json file
- New : Save the current state of the speaker group in a new preset
- Rename : Rename the selected preset
- Copy : Copy the state of the selected speaker group in the clipboard. The parameters can only be pasted in another speaker group
- Paste : Loads the parameters of the clipboard in the current speaker group
3 – Audio settings of the speaker group
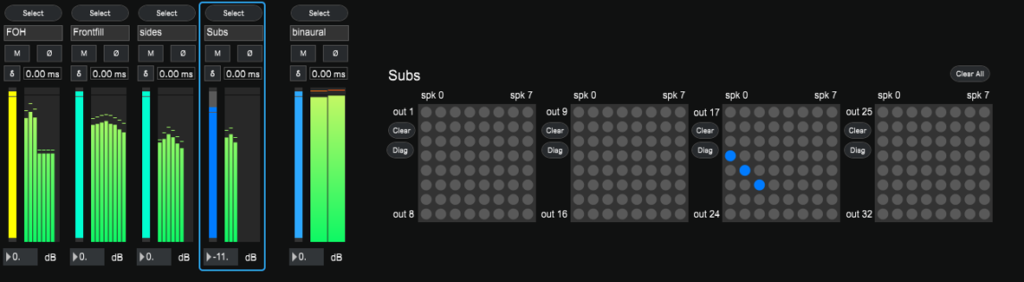
- Routing : The routing is done thanks to 4 matrixes for each speaker group. The columns correspond to the signals of each virtual speaker of the group (0 to 7), the rows correspond to the 32 available outputs (1 to 8, 9 to 16, 17 to 24 and 25 to 32)
Example: on the upper image, signals coming from the virtual speakers 0, 1 and 2 are routed to the outputs 17, 18 and 19 of the sound card
You can also use the Open Output Matrix button to route all signals at once from your speaker groups to the sound card outputs
- Clear : Save the current state of the speaker group in the current preset
- Diag : Check the diagonal of the corresponding matrix
- Select : Displays the configuration UI for a given speaker group
- Clear all : Reset the 4 matrixes
- Name : The name of the group can be defined and will be displayed for the send faders in the sources and reverb panels
- Mute : Cut the audio on all speakers of the group. It also cuts the processing of the group, consider mute unused groups to lower the CPU load
- Delay : Add a common delay to all speakers of the group. The delay can be set in ms in the numbox
- Fader : Gain control for all the speakers of the group
- Vu meter : Displays the audio level for each speaker of the group
- Phase : Invert the phase for all speakers of the group