This tutorial walks you through setting up the NESS Audio Object Controller VST in Reaper. You’ll learn how to control and automate sound object positions (X/Y), width, and other parameters in NESS using Reaper’s automation lanes.
The same operations can be done with any DAW that support .vst3 plugins.
Download and install the VST
-
- Download the plugin : select your version (Mac/ Windows)
-
- Install the VST
-
- Unzip the archive
-
- Place the .vst3 entire folder in your standard VST3 directory.
C:\Program Files\Common Files\VST3
- Place the .vst3 entire folder in your standard VST3 directory.
-
- Install the VST
Load the VST in Reaper
-
- Launch Reaper
-
- go to Options > Preferences
-
- Find the Plug-ins > VST section
-
- Click on Re-Scan > Re-Scan VST path for new / modified plugins
Insert the VST on a Track
-
- Create a new Reaper project or open an existing one.
-
- Add a track by clicking Track > Insert new track.
-
- Click FX on the track to open the “Add FX” dialog.
-
- Search for “NESS_OSC” and double-click to insert it.
Connect the VST to NESS via OSC
Configure IP Address
-
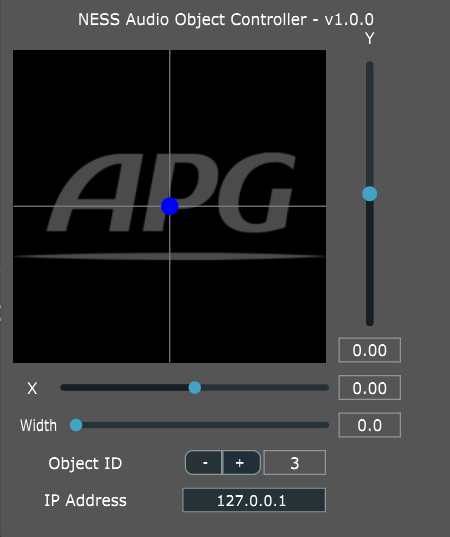
- In the VST GUI, find the IP Address field and enter the IP of the computer running NESS (often “127.0.0.1” if it’s the same machine).
Confirm Connectivity
-
- Go in the Settings Tab of NESS
-
- Set Receiving OSC on ON
-
- try to change the width fader on the VST
-
- you should in the incomming message section something like this:
/ness/obj/0/w 153.2
- you should in the incomming message section something like this:
-
- Set the Object ID to 1 and move the cursor on the XY Pad.
-
- The position of your first object in NESS should move.
Basic Controls in the VST
XY Pad
-
- Click and drag on the square pad to move your sound object in X (horizontal) and Y (vertical).
-
- The plugin sends OSC messages in real time to NESS (e.g.
"/ness/obj/7/xyz -0.45 0.52 0.00").
- The plugin sends OSC messages in real time to NESS (e.g.
Sliders
-
- X and Y Sliders: Another way to control the object coordinates.
-
- Width: Controls the spatial “spread” (0 = no spread, 1 = max spread).
-
- Object ID: Select which object slot in NESS you’re controlling (e.g. object 7, object 3, etc.).
IP Field
-
- Lets you change the OSC IP address, if you need to connect to a different machine.
Automating Positions in Reaper
Select the audio object in NESS you want to control
-
- set the Object ID on the number of the track of NESS you want to control
Enable Automation Lanes
-
- Click the Track Envelopes/Automation button (often labeled env).
-
- In the dialog that appears, locate the Parameters from the NESS VST (X, Y, Width, ObjectID, etc.).
-
- Click Visible and Arm on any parameter you want to automate.
Draw or Record Automation
-
- Draw Automation: Select a parameter’s automation lane (e.g. X), use the Envelope tool to draw curves.
-
- Live Recording:
-
- Enable Write or Touch automation mode on the track.
-
- Press Play/Record in Reaper.
-
- Move the XY Pad in real time. Reaper will record envelope changes on the selected lanes.
-
- Live Recording:
Play and Edit
-
- Once recorded, switch automation mode to Read, press Play, and watch the XY Pad move automatically according to the envelope.
-
- You can refine the envelope shapes (linear, curved, points) to achieve smooth or intricate movements.
Multiple Objects
-
- If you have multiple sound objects in NESS, create additional tracks or instances of the plugin, each set to a different Object ID. You can then automate each individually.
Testing and Troubleshooting
Check NESS
-
- In NESS’s UI or log (incoming messages), make sure it’s receiving incoming OSC for the correct object IDs and coordinates.
Network Setup
-
- If you’re on separate machines (DAW vs. NESS), verify firewall settings or that both systems share the same network.
No Movement?
-
- Confirm your automation lanes are active (not bypassed) and the track is set to Read mode.
-
- Check that the plugin’s IP address matches the one of the computer on which NESS is running